Change Django from SQLite to PostgreSQL on Windows
TODO fix the link at the bottom of this page!
This is part 3 of a 4 part series on how to setup Django locally on Windows and deploy to Heroku.
- Introduction
- Setup and Run Django+Heroku Locally on Windows
- Change Django from SQLite to PostgreSQL (this page)
- Split Windows and Linux Configurations
This page covers how to setup PostgreSQL on Windows and use it from a Django project.
PostgreSQL and psycopy2 Versions
Before doing anything to change Django, the local machine needs to have an installed copy of PostgreSQL and the psycopy2 Python adapter. Since this is on Windows, it is much easier to use already compiled versions, so long as all of the version numbers match.
First psycopg2. The easiest way to use psycopy2 on Windows (and have it work in a virtualenv) is the psycopy2-windows package.
The stack so far contains Python 3.4.3 64-bit, and on the package page, psycopy2-windows lists the Git tag for Python 3.4 64-bit:

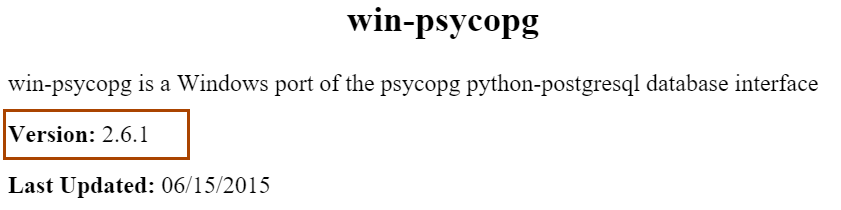
So far, so good. This library is a compile of a particular release of win-psycopg: 2.5.3 (documented on the package’s page). Next, go the win-psycopg page. At the time of writing, it’s latest version is 2.6.1, not 2.5.3.
To get the information for 2.5.3, at the bottom of the page, there is a link to Previous 2.x version. Keep clicking “Previous 2.x versions” until version 2.5.3 appears. The brightly coloured table tells which version of PostgreSQL this version of win-psycopg is for: 9.3.4.

Let’s summarize: pyscopg2-windows uses 2.5.3 of win-psycopg which uses PostgreSQL 9.3.4. Got that?
Install PostgreSQL
Download PostgreSQL 9.3.4 from EnterpriseDB then install.
But wait! Notice that version 9.3.4 isn’t listed here. Hovering over the 9.3.9 Win x86-64 button (or whatever currently shows), the download URL gives a hint: http://www.enterprisedb.com/postgresql-939-installers-win64?ls=Crossover&. The URL for 9.3.4 is therefore:
http://www.enterprisedb.com/postgresql-934-installers-win64?ls=Crossover&
Paste that URL into the browser address bar to download the version 9.3.4 and install it.
Note I would guess that the 9.3.x series maintains ABI compatibility, but after 1 min of searching, I didn’t find it explicitly stated anywhere. It was just faster to use the exact version.
Note You don’t need to setup anything via Stack Builder.
Install psycopg2-windows
psycopg2 is required for Django to connect to a PostgreSQL database. It needs to listed in the requirements.txt file so that Heroku automatically installs the dependency. Again, open requirements.txt and add the following to specify the new dependency:
dj-database-url==0.3.0 -e git+https://github.com/nwcell/psycopg2-windows.git@win64-py34#egg=psycopg2
The first line, dj-database-url, is a package that will help create the connection to the database, and second is the psycopg2 dependency.
Then execute the following to install the new dependencies into the virtual environment:
pip install -r requirements.txt --allow-all-external
Configure the Django Project
The default Django project uses a SQLite database, so Django needs to be told to use PostgreSQL instead.
Open speedydjango/settings.py, and navigate to the databases section starting at line 74. The existing code tells Django to use SQLite as the database:
# Database # https://docs.djangoproject.com/en/1.8/ref/settings/ #databases DATABASES = { 'default': { 'ENGINE': 'django.db.backends.sqlite3', 'NAME': os.path.join(BASE_DIR, 'db.sqlite3'), } }
Replace the existing code with the following:
import dj_database_url DATABASES = {} DATABASES['default'] = dj_database_url.config('postgres://USERNAME:PASSWORD@HOSTADDRESS:HOSTPORT/DATABASENAME')
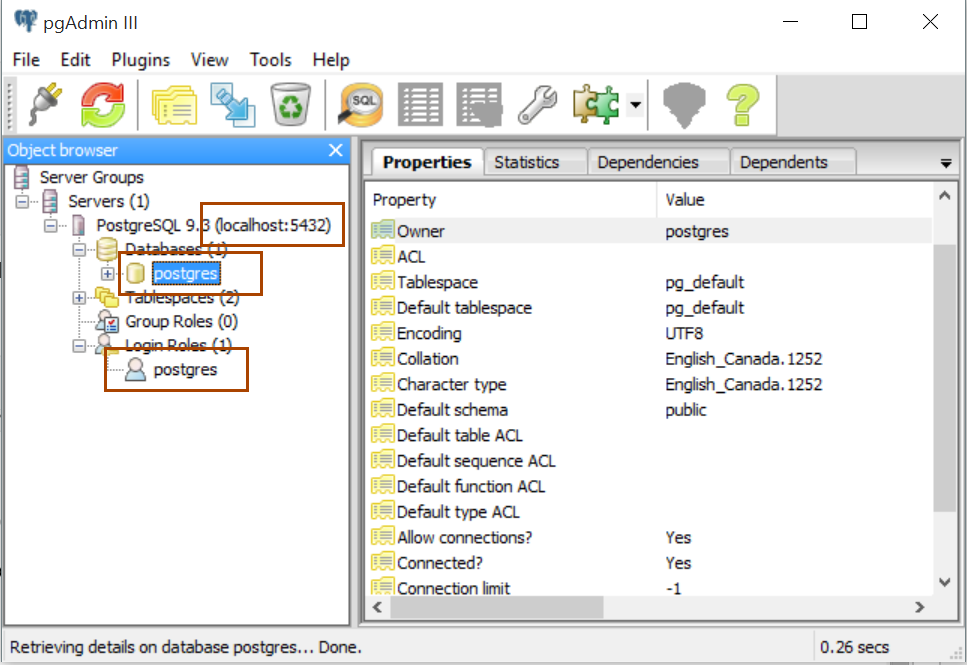
Note You can determine the names of the capitalized variables using pgAdmin III. Open pgAdmin III, select the database, then click Tools > Connect. The highlighted boxes, from top to bottom, show HOSTADDRESS:HOSTPORT, DATABASENAME, and USERNAME.
Note When deployed to Heroku, dj_database_url will automatically get the correct PostgreSQL connection URL because Heroku automatically creates the appropriate environment variable.
Note Finally, you should specify the local environment variables in a .env file rather than in your applications source.
Migrate the Database
At this point, executing heroku local starts Django and Django connects to PostgreSQL instead of SQLite. The final piece is to create the tables and fields that Django needs. To see that this is required, start Django directly at the command line (instead of through Heroku/forego):
python manage.py runserver
Performing system checks...
System check identified no issues (0 silenced).
You have unapplied migrations; your app may not work properly until they are applied.
Run 'python manage.py migrate' to apply them.
August 18, 2015 - 22:36:27
Django version 1.8, using settings 'speedydjango.settings'
Starting development server at http://127.0.0.1:8000/
Quit the server with CTRL-BREAK.
Just as it says, execute the following the migrate the database:
python manage.py migrate
Then run the server again:
python manage.py runserver
Performing system checks...
System check identified no issues (0 silenced).
August 18, 2015 - 22:37:30
Django version 1.8, using settings 'speedydjango.settings'
Starting development server at http://127.0.0.1:8000/
Quit the server with CTRL-BREAK.
Success! Django is now using the locally installed PostgreSQL.
Next split Windows and Linux configurations.